This post concentrates on how to make a simple 2 frame gif in Adobe Photoshop. There are no fancy skills, plugins or trickery required.
All that is required is a copy of Photoshop and a way to draw on your computer. You can draw on your computer with either a mouse or a drawing tablet.
In addition to discussing the animation tutorial, I will also touch upon zombie illustration and digital painting. (“Hollow Zombie” Created by myself)
The short and sweet answer on how to make a simple 2 frame gif in Photoshop
How to make a simple 2 frame gif? Short Answer
As a quick answer to how to make a simple 2 frame gif in Adobe Photoshop, you will need to create 2 images. Place 1 image on 1 layer and then place the other image on the other layer. 2 layers, will equal 2 animation frames.
The layers will need to alternate off and on, depending on whether you are on frame 1 or 2. The layers will act as the visuals in the frames of your animated gif.
In order to ‘animate’ your gif, you will need to go to the ‘animation’ window. The animation window is called “Timeline” in Photoshop.
With the first frame selected, you will need to show the first layer of your drawing. Frame 2 will reveal layer 2 and hide layer 1.
Loop the animation in the timeline window.
Play the animation, and you should see a 2 frame animated GIF if looped.
That is the short answer of how to make a simple 2 frame animated gif in Adobe Photoshop.

You will see the player dancing between the two frames.
For a more in-depth tutorial continue to read on.
How to make a simple 2 frame gif in detail | Animated Zombie
The quick answer above tells you the principle of how to make a 2 frame animated gif in Photoshop.
You create 2 layers that will act as the 2 frames of your animation – a simple animation. As the gif plays, it will give the appearance of motion by moving between the 2 frames.
Your layers will each contain a different image that will toggle on and off when played.
Once the animation has been completed, you will need to save to the correct file format. An animated gif or (.gif)
With the method of creating the 2 frame animated gif established. Follow the steps below.
Where to start?
*This animated gif of the “Hollow Zombie” (illustrated and painted by myself) shows the 2 frame animated gif in action. It uses the exact same method above – artwork on 2 separate layers. Play head alternates between the 2 frames/layers.

Tutorial | Steps on how to make a 2 frame-by-frame animated gif in Photoshop
Assuming you are familiar with Photoshop you will need Adobe PS software to make the GIF. This tutorial is based on creating the animation in Photoshop but the principle will potentially carry to another gif creating program.
Tutorial steps are as follows :
- 1) Create a new Document
- 2) Add a layer and draw on it (state 1)
- 3) Create another layer and draw on that also (state 2)
- 4) Bring up the animation window (Timeline Window) in Photoshop
- 5 ) Use the layers to create the animation in the Timeline window
- 6 ) Save for web
Step 1 ) How to make a 2 frame animated gif Photoshop – a new document
The first step, create a “New Document” in Photoshop. Set the document to 100 pixels x 100 pixels for now. (As we are just learning)
If you are unsure of how to create a new document in Photoshop. Go to – File > New Document and press the follow the settings through.
Tip (stick with 100 px by 100 px and 72DPI for now, you can do your own later!)
You should now have a new blank document in Photoshop. This will be your stage for your 2 frames animated gif!
Step 2 ) Draw the first frame/layer of your 2 frame animated gif
In order to create your 2 frame animated gif in Photoshop. You will need to start by creating some artwork to go into the animation.
This step will concentrate on creating on the technical side more than the artistic side.
So.
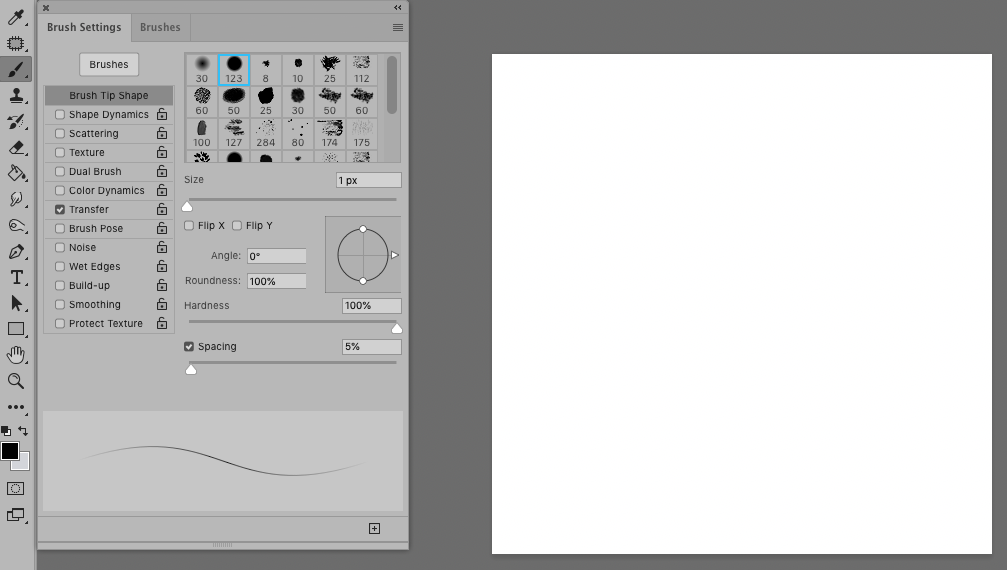
With your ‘layers window panel open’ ( F7 shortcut), create a new layer. If you cannot see your layers window, go to ‘window’ and select “layers”. Or press F7 on your keyboard.

Draw the first frame of your 2 part animated gif.
For this, why not select a black brush and draw a circle and with a neutral face. As shown.
You should now have a black outline of a face on your first layer. Don’t worry about the artistic part just yet.
Step 3 ) Label the layer of your animation
Now that you have a face staring out of Photoshop, you should label the layer. It is a good practice to label the layers of your artwork, especially for bigger projects.
It should be noted that this is not a compulsory step but could save you problems later.
To label the layer.
Right-click on the text next to the icon. Call this layer, “State 1”
You now have 1 half of your, 2 frame animated gif. The next step. You will need to create frame 2 for the second part of your animated gif.
Step 4) Create the second frame of your animated gif (add another layer)
After creating the first frame of your 2 part animation you will now need to create the second frame. In order to make a 2 part animated gif – logic will say you need 2 frames in this instance.
You may have also noticed that the layers will show these visuals in the frames. They will correspond with one another.
Very soon!
One of the most straightforward ways of creating the second frame of your animation is by duplicating the existing one. With the frame one selected as a layer. Shortcut and duplicate the layer.

You can go to layer and press “duplicate” or drag the current layer onto the layer shortcut icon. A ( + ) in a little box at the bottom of the layers panel.
Or, press ( Apple + J or CTRL + J on PC)
Select your new layer. (Frame 2, call it “state 2”)
With the Eraser tool (E) rub out the middle of the face or just the mouth.
Select the brush tool, as before.
Pick black as a colour and now draw a tongue sticking out.
The second frame (feel free to label it “State 2”) will now have a face with a tongue sticking out.
The next step of the 2 frame animated gif project – is to animate it.

Step 5 ) Creating the ‘animation’ for your animated gif
This stage is a key step in creating your 2 frame animated gif. This is the stage that takes 2 static images on layers in Photoshop and adds motion to them!
Animation Project Checklist ( keeping on track )
A square document. The square Photoshop document should have 2 layers. These 2 layers should have the 2 states or frames of your animation. A normal face on one layer. And a face with a cheeky tongue poking out on another layer.
These 2 layers are key in making your 2 frame animation.
Why will the layers make up the parts of the animation?
These 2 layers will become your frames. Frame 1 = normal face. Frame 2 = tongue out face.
In other words.
Frame 1, will show the expression on layer one when it comes to the run time. “State 1”
And frame 2, will show the tongue expression at run time. All going well!
Now that you have completed the following steps, now is the time to open up the animation window (Timeline Window) and turn those layers into frames for animation.

Step 5.1) Animating a gif in Photoshop | Different animation modes
Go to Window – and open the Timeline Window in Photoshop.
You should now see a timeline window in appear Photoshop. This will be the area in which you will control the animation and bring it to life!
To keep the principle simple, we are going to work with a more classic Photoshop animation mode.
Create a new animation
You should now see a single frame with numbers underneath. These numbers underneath the cell are the duration in which the frame will be displayed. 0.1 second, 0.2 seconds.

How to turn the frame by frame animation mode on in Photoshop?
To turn the frame by frame animation mode on in Adobe Photoshop, you will need to select this button. (bottom left of the window)
The classic animation button switches to the Photoshop animation (Timeline) to classic animation mode, similar to traditional animation methods.
To turn the animation mode to the frame by frame mode or classic mode select frame ‘film reel icon’ located in the bottom left of the Timeline window.
This button allows you to toggle between the animation modes in Photoshop.

Step 5.2) Adding the extra frame to your animation
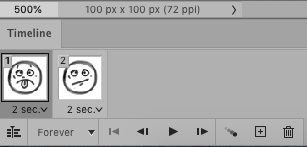
You can now see that you have 1 frame in your Timeline window. For this project to become an animation, you will need to create or add another frame to your timeline.
Select the following button and add another frame. ( You are nearly there!)
You should now see 2 cells inside the Photoshop timeline window. These 2 frames will be sat next to each other, displaying the 2 parts of your animation.
Next.
Select ‘frame 1’ in the Timeline window.
Now go to the layers window.
Select the first drawing layer you created, it will be the face with the tongue sticking out. (or called ‘State 1’ if you renamed it earlier) and turn its visibility on.
*Remember you can toggle the layer visibility by pressing the ‘eye’ icon next to the layer thumbnail.
Frame 1 of your animation should show the face with the ‘tongue in’ in your Timeline window.
The second frame of your animation will show the next face.
Step 5.3) Creating the second frame of your animated gif
Make sure you have the second frame in your Timeline window selected.
With the second frame of the animation window selected, go to the Photoshop layers panel. (like before)
Hide the ‘first layer’ by toggling the visibility – the layer with the neutral face.
Select the second layer you created earlier, and make it visible. (While the second frame of your animation is selected.)
Hit the play button in the Photoshop Timeline window.
You should now see animation in your Timeline window with the face alternating.
If not, retrace your steps.
The principle of why you are toggling the layers on and off to create a gif
What you have just created in Photoshop, is 2 part gif animation that jumps between 2 frames on a continuous loop.
By using the layers in your document, they use a hide and reveal the method in conjunction with your timeline.
When on frame 1, reveal picture 1 and hide layer 2 in the layers.
When the player is on the 2nd frame, hide layer 1 and show whatever on layer 2!
With the heavy lifting for creating your 2 frame animated gif complete, now it is time to save your animated gif.
Get ready internet!
Step 6 ) How to save your two-frame animated gif for the internet ( In Photoshop)
This is for the last step and you are ready to use your animated gif. In Photoshop you can use an option called “save for web” to create an internet-ready .gif.

File > Export > Save for web >
The save for web window will show a range of options and settings. Now is a good opportunity to do some pre-flight testing of your animated gif.

Make sure your animated gif ‘loops’. To make sure your gif ‘loops’ (Plays over and over)
Hit play (bottom right of save for web window) and see how it looks. If you are satisfied with what you see now output your animated gif by pressing ‘save’.
Place your .gif in a location in which you can find it.
And that is how to make a simple 2 frame gif. I used a very similar principle on this animated picture of the Hollow Zombie below.
If you have had enough of this tutorial or would like to look at my other projects feel free to browse
How this animated Zombie was created in Photoshop
In order to create this 2 frame animated zombie, I used the 2 frame layer method in Adobe Photoshop – as shown throughout this tutorial.
2 digital paintings were imported into a new photoshop document and placed onto separate layers.
These separate layers became the basis of the 2 frame animation. One frame shows the before and the following frame shows in the after.
Once the frames were set up and put on a loop, the animation was saved as a .gif.
– Dawn Chorus
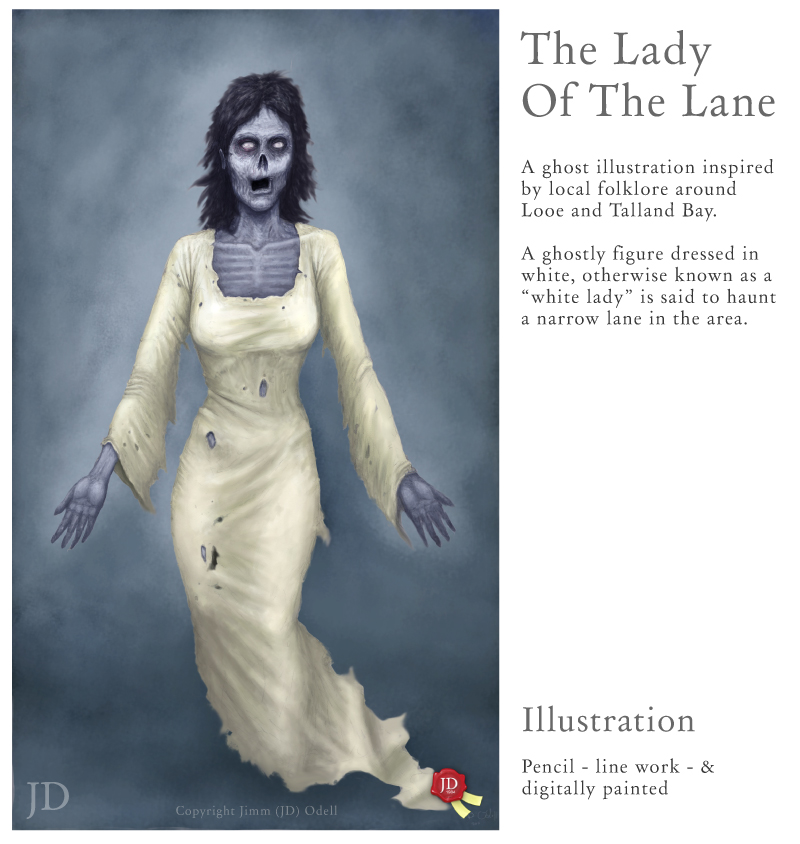
– Lady of the Lane
How to make a simple 2 frame gif in Photoshop – answer summary
To summarise how to make a 2 frame animated gif in Photoshop – using the classic animation method. You will need to create 2 layers, these 2 layers will act as your ‘frames’ for your animation.
You will need to toggle the visibility of the layers on frame 1 or 2. When the playhead is on frame 1 of the animation. Set ‘layer 1’ to visible in your layers panel and set layer 2 visibility ‘off’
When on frame 2 In the animation window in Photoshop, turn the visibility of layer 2 to ‘On’. And then, turn the visibility of layer 1 off.
And that is the principle of how to make a simple 2 frame gif in Adobe Photoshop.
A handy gif animation tutorial in Photoshop
Thank you for taking the time to read this tutorial on how to make a 2 frame animated gif. I love to make animated gifs when appropriate for projects.
Animated gifs add spice and interest to the internet!
You make also be interested in some of the following posts an articles.
– Dawn Chorus Illustration
– Lady of the Lane Folklore
Copyright JD illustration – Hollow Zombie